
Old World Elegance


Bedroom Set Example 1

Bedroom Set Example 2

Bedroom Set Example 3

Bedroom AI Visual A

Bedroom AI Visual B

Bathroom Set 1

Bathroom Set 2

Bathroom AI A

Bathroom AI B

Livingroom Set Example 1

Livingroom Set Example 2

Seating Area AI A

Seating Area AI B
Bedroom Styling
CONTEMPORARY ELEMENTS
Non-Traditional or Asymmetrical Interest
LAYERED LIGHTING
Non-Competition, Blends in, & Compliments
LAYERED NATURAL COLORED TEXTURES
Ivory Duvet, Fluted or Woven Furniture, Rug
FOCAL POINT
Bed Framed by High Contrast Lanterns
LAID BACK LUXE
Custom Looking Furniture with Hints of Gold-Bronze Pieces
RELAXING COLORS
Ivory, Beige, & Few Contrasting Colors for Depth
SEATING OR VANITY AREA
Soft Curve Seat & Uniquely Curated Looking Furniture
Contemporary, Relaxing, Luxe

Focal Wall Styling

SOPHISTICATED
All Marble Wall

COZY VINTAGE
Carpet on Wall

CONTEMPORARY
1/3 of Wall Wood, Rest Marble

MODERN
Wood Panels Framing Marble
Wall Tips
1. Focal point is where you center the bed.
2. Add a wood strip to transition from wood to marble if not flush.
3. If the closet is next to the bed, you can use the same color wood to blend in seamlessly with the wall to look built in & grand as shown in the 3rd image.


Livingroom Decor Guide
CONTEMPORARY ELEMENTS
Curved silhouettes, neutral with contrast
LAYERED LIGHTING
Accent gold light, stone lamp, & recessed lighting
LAYERS OF NATURAL COLORED TEXTURES
Stone vessels, soft fabrics & patterns
FOCAL POINT
Centered with the chimney emphasized with the furniture & lighting
LAID BACK LUXE
Natural & comfy furniture, hint of gold, & built-ins
RELAXING COLORS
Warm wood & creams with a few contrasting colors for depth
OPEN SOCIAL SEATING AREA
Dynamic variety to invite socialization & open casual movement such as the open woven back chairs & small benches.
Contemporary, Relaxing, Luxe

Focal Wall Styling & What to Look For

WOOD CEILING
The wood contrasting with the wall grounds, gives depth, & warms up the space in an overall white ivory & light filled space.
STONE WALL
Split-face or fieldstone emphasizes the focal wall with texture, charm, & blends with nature expanding the space & blends with the stone chimney.
HERRINGBONE FIREBRICK
Classic & clean balancing the organic stone surrounding it.

Bathroom Decor Guide
CONTEMPORARY ELEMENTS
Curved silhouettes, neutral with contrast
LAYERED LIGHTING
Recessed, vanity, & natural
LAYERED NATURAL COLORED TEXTURES
Mat, towels, ceramics, neutral tile to soften the all-white bathroom
FOCAL POINT
Shower or window or vanity that you face first to be emphasized architecturally or framed
LAID BACK LUXE
Antique gold to bronze pieces without competing accessories. Example: Lessen the amount of gold by adding darker metals or hidden storage such as tiled drawers with an under lip or push to pull open system.
AIRY FEEL
Natural light continued through clear glass shower panel, open shelving, greenery to extend nature in
Elevated Spa Sanctuary


Shower Wall Tile + Grout Matters
SHOWER TILE
Waterproof materials such as porcelain, ceramic, stone, & glass.
WHY GROUT
Holds tiles to expand, extract, & properly seal.
SIZE GROUT
1/8" with unsanded grout, rectified porcelain & glass tiles can go as thin as 1 1/16" with sanded grout - very sleek but requires precise installation.
LIGHTER COLOR GROUT
The cream tile in the 1st image blends in more with light beige grout making it look minimalistic & is a great alternative from buying larger expensive slabs for a similar look.
DARKER COLOR GROUT
The cream tile in the 2nd image has a more rustic look making the tiles more visible with the higher contrasting color grout.
SPACERS
1/8" grout uses 3 mm spacers & 1/16" grout uses 2 mm spacers.
Sarai's Curated Shopping List


Interior Guides
Rug Layout Guide
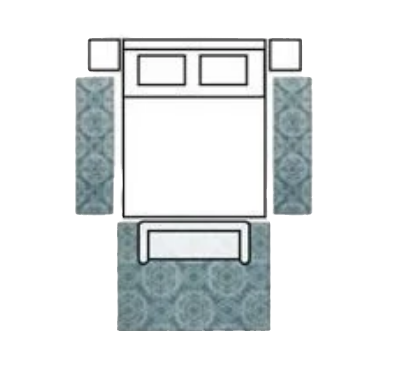

4'x6' & 5'x7'
Small rug area rug ideally with a coffee table to anchor the room.

6'x9' & 8'x10'
Great for anchoring the space or creating a focal point with all furniture feet on the rug.

9'x12' & 11'x14'
Fully integrated look & great for large shared open spaces to have its own section.
Curtain Guide


DIY Floating Bathroom Vanity
FIRST: MEASURE YOUR SPACE
Measure your bathroom to determine the maximum vanity width, depth, and height that will fit your space. Consider the placement of your plumbing, sink, faucet, and any tile you plan to use.
Because this is a floating vanity, it needs to be securely attached to the wall studs. A French cleat system can provide strong support while keeping the vanity hardware hidden. For a visual guide on how to build a floating shelf using a French cleat system, see this YouTube tutorial.
BUILDING THE VANITY
1. Construct the Frame
-
Build the vanity box using moisture-resistant plywood or MDF. Cut the pieces according to your measurements and assemble them into the desired configuration.
-
Add internal braces to strengthen the frame and provide additional support for the countertop and sink.
-
Be sure to leave enough room for your plumbing, including the drain opening and water supply lines. If your plumbing is located inside the wall, account for those connections when designing the back of the vanity.
2. Mount the Vanity
-
Locate and mark the wall studs before mounting the vanity.
-
Attach the French cleat or other appropriate wall-support system directly into the studs.
-
Carefully position the vanity frame onto the supports and secure it according to your chosen mounting method.
-
Use a level to make sure the vanity is perfectly straight before fully tightening the hardware.
TILING THE VANITY
3. Add Tile Backer Board
-
Install cement board or another appropriate tile backer board over the vanity top and any surfaces that will receive tile.
-
Follow the manufacturer's instructions for fastening and preparing the backer board.
4. Waterproof the Surface
-
Apply a suitable waterproofing membrane, such as RedGard, according to the manufacturer's instructions. Pay particular attention to seams, corners, and areas around plumbing openings.
-
Allow the waterproofing system to cure completely before installing the tile.
5. Choose and Lay Your Tile
-
Porcelain and ceramic tile are excellent choices for a bathroom vanity because they are durable and moisture resistant.
-
Before applying mortar, dry-fit your tile to determine the best layout. This allows you to plan your cuts and avoid awkwardly placed pieces.
-
Once you're happy with the layout, use the appropriate thin-set mortar to adhere the tile to the prepared surface.
6. Grout and Seal
-
After the thin set has cured according to the manufacturer's instructions, apply grout to the tile joints.
-
Clean away excess grout and allow it to cure properly.
-
Seal the grout and any appropriate joints according to the products you're using to help protect the vanity from moisture.
FINISHED!
7. Install the Sink & Faucet
Once the tile work is complete and fully cured, install your basin sink and faucet. Connect the plumbing, check for leaks, and make sure the sink is securely installed.


Packages Coming Soon

Coming Soon...Silena's Kitchen

Coming Soon...Jael & Heber

Coming Soon...Esther

120 Waterfront Street, Suite 420, #2455, National Harbor, Maryland
homebyyvonne@gmail.com
301-818-2714
© 2035 by @Serenityartstuff. Made with Wix Studio™